Colorfastness to Perspiration
AATCC 15-1997 pdf free.Colorfastness to Perspiration.
7.1 Verification checks on the operation of the test and apparatus should bemade routinely and the results kept in alog. The following observations and corrective actions are extremely important toavoid incorrect test results.
7.2 Use an in-house perspiration fabricwith a midrange visual grade on themost heavily stained stripe of the multifi-ber cloth as a calibration specimen andconduct a perspiration test using threespecimens.Verification checks should beperformed periodically as well as eachtime a new lot of multifiber or undyed ad-jacent fabric is used.
7.2.1 Nonuniform color transfer maybe due to improper wetout procedures ormay be a result of uneven pressure on thespecimens due to warped plates in thetester. Check the wetout procedures tobe sure that the balance is accurate andthat the procedure is being carefully followed. Check all plates to be sure theyare in good condition and not warped.8.Test Specimen
8.1 Number and size of specimens.8.1.1 Cut one 6×6 0.2 cm specimenfrom each sample and an equal size pieceof multifiber test fabric. Do not use multifiber test fabric that has fused edges because it might have thickness variationsat the edges which would cause unevencompression during testing. If the fiber or fibers in the dyed fabric are not present inthe multifiber test fabric, also include apiece of undyed original material in thetest.
8.2 Preparation of specimens.
8.2.1 Sew or lay the multifiber test fabric to the technical face of the test specimen and if used, the undyed original fabric, with the specimen between to make asandwich assembly.
9.Procedure
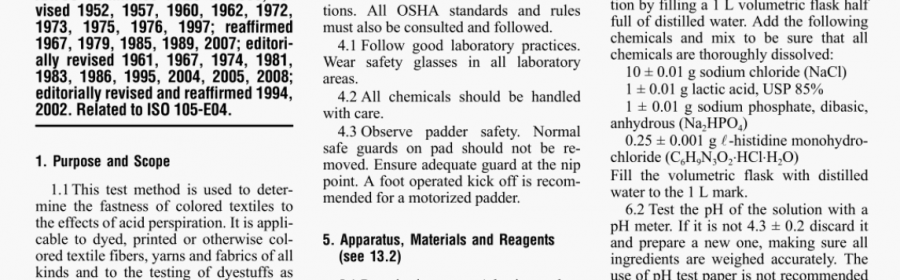
9.1 Place each test specimen (as pre-pared in 8.1 and 8.2) in a 9 cm diameter,2 cm deep petri dish. Add freshly pre-pared perspiration solution to a depth ofi.5 cm in the petri dish. Soak the testspecimen in the solution for 30 ± 2 minwith occasional agitation and squeezingto ensure complete wetting. For fabricshard to wet out, alternately wet the specimen and pass it through the wringer untilit is completely penetrated by the solu-tion.
9.2 After 30 ± 2 min,pass each testspecimen assembly through the wringerwith the multifiber stripes perpendicularto the length of the wringer rolls (allstripes go through the wringer at the sametime). Weigh each test specimen to besure it weighs 2.25± 0.05 times its original weight. Because certain fabrics maynot be able to retain this amount of solu-tion when passing through a wringer,such fabrics may be tested after blottingto the required wet pickup with WhiteAATCC Blotting Paper (see 13.4).To obtain consistent results ail specimens of agiven construction in a test series shouldhave identical pickup,as the degree of staining increases with the amount of retained solution.
9.3 Place each test specimen assemblyon a marked plexiglass or glass plate withthe multifiber stripes running perpendicu-lar to the long dimension of the plate.
9.4 Depending upon equipment available, use the following alternates:
9.4.1 Horizontal Perspiration Tester:Place the plates in the perspiration testerwith the specimen assemblies evenly distributed between the 21 plates. Place all21 plates into the unit regardless of thenumber of specimens. After placing thefinal plate in position (on top) set the dualplates with compensating springs in posi-tion, place the 3.63 kg (8.0 lb) weight ontop making a total of 4.54 kg (10.0 ib) under the pressure plate, and lock the pressure plate in position by turning thethumb screws. Remove the weight andplace the unit lying on its side in the oven.
9.4.2 Vertical Perspiration Tester: Assemble the plates in the perspirationtester with the specimens evenly distributed between the 21 plates. Place all 21plates into the unit regardless of the number of specimens.The plates are held in avertical position between an indicatingscale with a fixed metal plate at one endand an adjustable metal plate at the otherend. Use the adjusting screw to exert a4.54 kg (10.0 1b) force against the plates.Lock the specimen unit containing thetest specimens with a set screw. Removethe pressure gauge unit from the specimen unit and place the specimen unit inthe oven. Another specimen unit may beadded to the pressure gauge unit and theloading procedure repeated.
9.5 Heat the loaded specimen unit inan oven at 38±1°C (100±2°F) for 6h±5 min. Check the oven temperature periodically to be sure it remains at the speci-fied temperature throughout the test.
9.6 Remove the tester from the ovenand for each test specimen assembly, separate the multifiber fabric and,if used,the adjacent fabric from the test fabric.Place the multifiber fabric and test fabricspecimens separately on a wire screen ina conditioned atmosphere (21± 1°C,65±5% RH) overnight.AATCC 15 pdf download.Colorfastness to Perspiration